How to Write a Check + Balance Your Checkbook
Many of you may have never written out a check, I am here to help you prepare for when that comes
Welcome to the 10 new “In-Between‘s” who have joined us since last weekend! Join the 315 others by subscribing here if you haven’t already 📩:
Have you checked out The In-Between Podcast on Apple Podcasts yet? Give it a listen by clicking the button below if you haven’t already 🎙️:
A Major Milestone
You might be saying “C’mon Griffin, this isn’t a major milestone.” Well, I beg to differ. If you are finding yourself needing to have a checkbook, making major payments using checks – then you are probably more self-reliant and responsible than you realize.
Writing out checks might not seem as commonplace in today’s world, but it is still used enough that it is important for everyone to learn this simple task. I promise it’s not that hard.
Follow along as we go over how to even get a checkbook (you must start somewhere), an easy 6-step process of writing out a check, and how to balance that checkbook of yours.
Obtaining a Checkbook
This is the easiest step. All you need to do is follow one of these two paths:
1. Go to a local branch of your bank and talk to a representative about getting a checkbook that is linked to your account.
-or-
2. Login to your mobile banking app and find the section explaining how to order checks for your account.
Boom! That’s it. You should have a checkbook full of checks in no time. See how easy that was?
Writing a Check
When writing out a check it is easiest to always go in the same pattern for every check. This helps you to not get any of the lines confused with one another and organize all of the important information that goes on a check.
Step 1: Pay to the order of
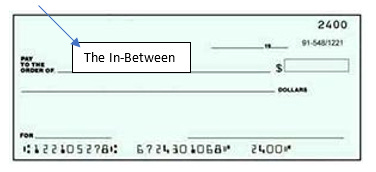
This basically means, “Who are you paying this money?” Filling out who the check is for is always a great place to begin. The line for you to write this information is labeled, “pay to the order of.” This will either be a person’s name or a company name.
Try to be as clear and specific as possible here. If you are paying a company for their services, make sure that is what you are writing, not an individual person’s name. There should be no discrepancy about who the money is intended for.
See below these nifty diagrams to help visualize the line of the check we are discussing. Below is an example of what you could write on the, “pay to the order of” line.
Step 2: Write out the date
Dating anything is always a good idea. Dating a check is a step you cannot forget. In the top right corner of the check, you will see a date section where you will write out the current date. Did you catch that? Write the date of when the check is being written, NOT the date you plan to give it to someone, or any other random day in the past or future.
There’s a little repetition just in case you get confused on which date to put in this section.
Check out the example below!
Step 3: Write a memo
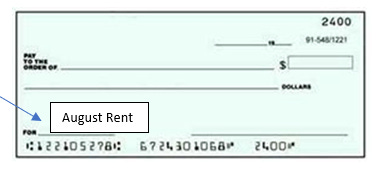
Step One explains how and where to write who the check is for. The memo section at the bottom is where you write what the check/payment is for. Examples of services you might be using a check for are August rent, car windshield replacement, Fall 2021 tuition, etc. Be very specific. This is not like Venmo where you can write, “Last night’s tacos, bro!!!” with three taco emojis and a beer emoji. The people trying to cash that check are going to have a very difficult time explaining that one.
This specificity is beneficial for both parties involved because it helps remind everyone what this payment is for. This is also important for your own records when you are balancing your checkbook. Don’t worry, we will get there😉.
Step 4: The specific amount (in numbers)
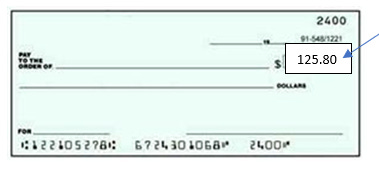
Time to put down the actual amount you are paying. Make this section as clear as possible and use your best handwriting. Make sure you include the dollar amount and the cents. If the numbers are not written out well, the ATM or bank teller will not be able to process the check and it will just cause a headache for you. So, it is best to take your time on this section. Note that the dollar symbol ($) is already provided for you, no need to rewrite it.
Step 5: The specific amount (in words…not kidding)
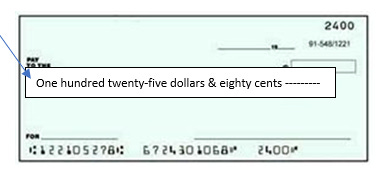
That long line through the middle of the check is for the dollar amount, written out in words. You just wrote the amount on the right side in numbers. Now it is time to write it out in words. When writing out the amount in word form there are only two things you need to remember:
1. Write out the dollars & cents in word form
2. If there is any excess white space, draw a line through it so nobody can add words to what you wrote (a security precaution)
That’s it! Check out the example below with the payment amount used in Step 4.
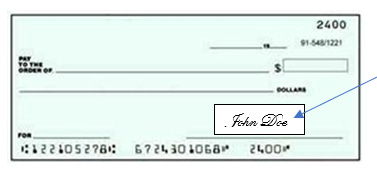
Step 6: Add your signature
Finally, do not forget to sign the check on the bottom right-hand line. Once you have signed it with your legal signature, you are good to go! Make sure that you use the signature you use on all bank documents to ensure that the bank knows without any doubt that is your check with your signature.
Once that is complete, voila! You did it!
Balancing a Checkbook
Each checkbook you receive from the bank will come with a pad of labeled rows and columns to keep track of withdrawals and deposits made from your accounts. “Balancing your checkbook” is a fancy way of saying “double checking that the deposits and withdrawals from your account identically match with the checks you have written out and the checks you have received.”
The way I do this is, whenever I write a check, I immediately fill out the statements to reflect that amount and description before I forget. Once the check is cashed properly, I check it off the list.
I do this on repeat for not only checks I write, but for checks I receive as well. The image below shows an example of a balanced checkbook to give you a better idea of how one of these statements could be filled out. This is not my checkbook, it is an internet image, FYI.
It is simple, and everyone has their own system to their checkbook, so find what works for you!
Time to Start Writing Checks:
Writing checks might be outdated compared to technological ways to exchange money like Venmo and Zelle, but like paying taxes and buying houses, it will always be around. Take some time to get yourself a checkbook and learn how to use it. We were never taught in school, but The In-Between community is always here to help!
Cheers!
Featured Newsletters
This week we have another great collaboration with great newsletters! Check it out below and subscribe!
Growth Currency
Growth Currency is a newsletter by creators, for creators. You’ll get a weekly dose of curated links to things like...
→ helpful tools
→ valuable courses
→ marketing tips
→ actionable resources
→ creator communities
All this to help you go from learning to earning as an online creator. Join over 500 other subscribers already getting Growth Currency in their inbox each week.
Click the button below to subscribe today:
You Should Definitely Share: The In-Between Newsletter
This newsletter has been growing so much since I started it in August! We are already up to 315 subscribers. Let’s keep the momentum going!
I want this newsletter to be for anyone, all ages, and all backgrounds.
Like I said above, I feel like the public school system does not always teach us some of the most important information we need to be ready for the real world. And so, The In-Between Newsletter was born. I write about topics ranging from career, finances, personal development, and everything else in between that I think everyone would benefit from.
So, if you know anyone that would benefit from a weekly newsletter written by a great, humorous, overall exceptional writer, then share the link and just put in an email!
I appreciate all the endless support and look forward to growing this thing even bigger.
Follow The In-Between Social Media Page!
Click the button below:


